Tutorial: Custom ZLIKS By Bil BetsOvic
Mar 5, 2007 Author: Tahir | Filed under: Artists, Bil BetsOvic, Custom Toy Tutorials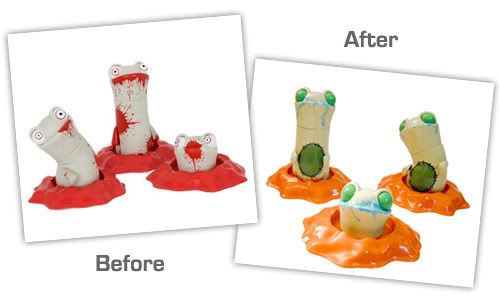
Tutorial by Bil Betsovic.
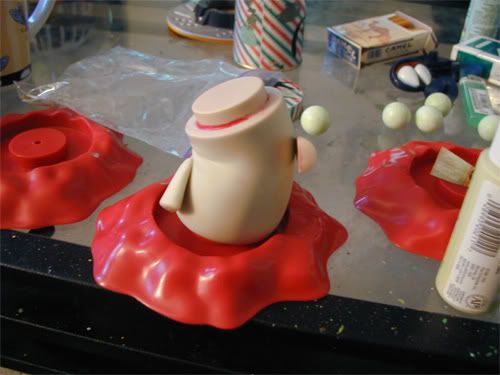
Step 1: Striped the original paint off with goof-off (DO NOT use on plastics. l learned the hard way by ruining a 10 inch icebot body) This stuff is amazing on vinyl as it takes off factory paint in a couple of swipes!!
The brush I usually use is a synthetic hair brush. I feel they work the best for me and get a real smooth finish. I usually wait around 30 minutes per coat for drying time. I keep my hands very clean every time I wash the brush and I make sure to wash ALL paint of my hands. Also I have learned that if you don’t sometimes you may go to grab the piece your working on and put a big blue mark all over it.
Step 2: Heated up the heads with a hairdryer and popped the eyes out. Then started the 1st coat with FOLKART acrylics.
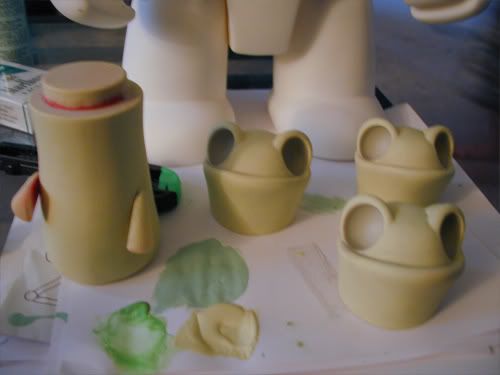
Step 3: This is after the 1st base coat of the orange paint, you can barely tell but its there. I had to do around 12-15 coats of this orange to get it the final orange color.
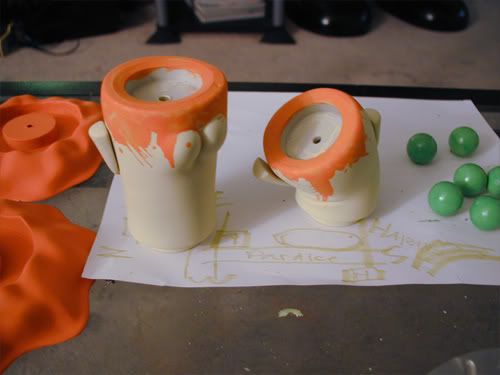
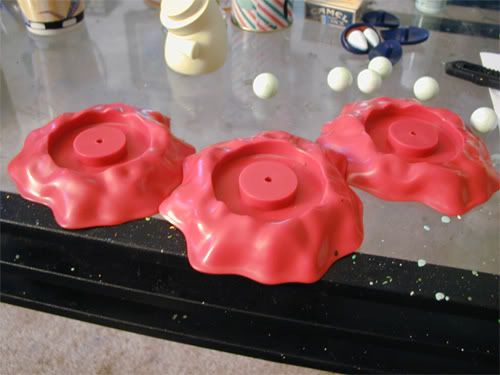
Step 4: This is where i started to run the lava up the bodies of the ZLIKS and added the drool around the mouth by just adding a lil water to the acrylics. You can also see that the eyes have been coated quite a few times with GID green paint. You can also see a road map to my friends AKERS house.
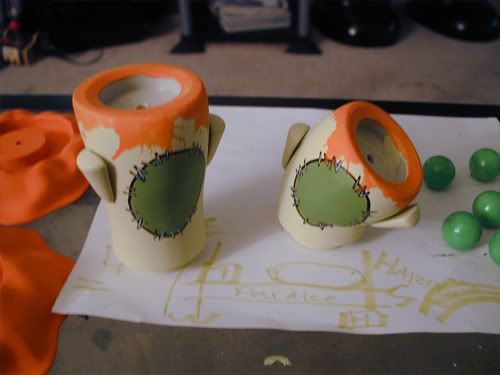
Step 5: Now I started on the belly patches using the same paint.
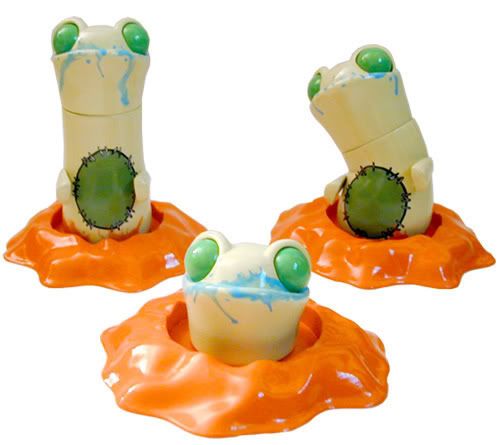
Step 6: After all the painting finished I clear coated it with 3x krylon and all the pieces of the toys were put back together.
All the rest is a SECRET hahahahahahahahahaha
Tutorial by Bil Betsovic
Categories
- Artists (580)
- 12punt3 (2)
- 64 Colors (2)
- aargh (1)
- Aaron "Aaalke" Keeling (1)
- Aaron Boy (2)
- AKA MAG (2)
- AKO – Akayo (1)
- Albert Art (1)
- Alex (aka Lizard J) (1)
- Amy Jenkins (1)
- Angelica (4)
- Anna Hamilton (3)
- Anna Härlin (1)
- Aparatchik (3)
- APW@HY (1)
- AtK (1)
- Attila (6)
- Augiewan (2)
- BELL (4)
- Ben The Illustrator (3)
- Bil BetsOvic (16)
- Biscuitboy (1)
- BleedingEdges (1)
- Bob Conge – Plaseebo (7)
- Bob Horner (1)
- Bovinyl (1)
- Brent Nolasco (1)
- Brian Castleforte (5)
- Brian Colin (2)
- Brigid Ashwood (1)
- Bruce Richardson (2)
- Bryan Collins (3)
- Bytedust (3)
- Catherine J. Cruz (Kositanont) (1)
- Charles Rodriguez (2)
- Charlie Alan Kraft (1)
- Charuca (1)
- Cherise R. Ward (1)
- Chris Athans (1)
- ciah-ciah (3)
- Cidenzo (2)
- Clint Anscombe (1)
- Cloudsfactory (1)
- Cocoakoala (2)
- Collin David (1)
- Coreroc (5)
- Cragmire (6)
- Creepy (aka J. Yonkman) (1)
- Cynjon Noah (1)
- D Emory Allen (2)
- D-LuX (1)
- Dan May (1)
- danii (1)
- Danny Roldan (4)
- Darryl Kluskowski (1)
- das mo (2)
- Davidrios Ferreira (2)
- Dawid R. Kwiatkowski (1)
- Derek Kiser (1)
- DJA aka Left-I (12)
- Django / TheRealDjango (1)
- DLi$h (2)
- Doktor A (7)
- Doug Land. (1)
- Dr. Bao / NVC Crew (1)
- DragonCypher (1)
- Dril One (3)
- Dust (1)
- Eloole (2)
- EmaStudio (1)
- enigmainsoluto (2)
- Ennio Milani (1)
- Era (1)
- Erwin Weber (7)
- Esro (1)
- Eyebone (5)
- Fabio Rossi (1)
- Fabiola Baires (3)
- Federico Gonzalez (2)
- Federico Mancosu (1)
- Felix Jackson (1)
- fershozombie (1)
- Fervid Unicorn (1)
- Fi the Imaginator (1)
- Flod (1)
- Florence McLean (2)
- Fluffels (1)
- Freck (1)
- Frenchie (2)
- Gawein (5)
- Gigglesauce (2)
- Gods & Monsters (1)
- GoNi (1)
- Grimsheep (2)
- Hans Yim (2)
- Hellopike (2)
- Hugh Rose (1)
- Idle (5)
- Ingeborg Hairwassers (1)
- Irfan Hendrian (1)
- Israel Chavira (8)
- ivy (1)
- James "Jimbot" Demski (2)
- James – Style43 (1)
- James yeah (4)
- Jared Gagne (2)
- Jason Kochis (7)
- JennyFur Deveraux (3)
- Jeremiah Ketner (1)
- Jesse Hernandez (1)
- Jim Koch (4)
- JMS – Jovy (4)
- João Silva (1)
- Joe Grady – RebelWookiee (2)
- Joe Grady a.k.a. RebelWookiee (2)
- Jon Daulby (1)
- Jonathan Minori (1)
- JonDoesDoodles (2)
- jonpaulkaiser (4)
- Jorge Koke Petit (1)
- Josh (f+) Pearce (3)
- Josh Divine (1)
- JP Artwork (2)
- K.I.A. (1)
- KaNO (1)
- Karitas Palsdottir (1)
- kas (1)
- Kat Brunnegraff (3)
- Keeley Carrigan – BlooEmpire (1)
- Kenn Munk (7)
- Kerry Lee (1)
- Kevin Gosselin (2)
- Kill Taupe (1)
- Konako (1)
- KT (1)
- Kye Pirrie (1)
- La Merguez Masquée (1)
- Laska Comix (1)
- Lawrence Northey (1)
- Leecifer (1)
- Leftygohome aka. SMS (1)
- LEX (8)
- Lizard J (1)
- Lou Pimentel (2)
- Lydia Dekker (1)
- M.A.R.T.A (2)
- Mad Pierrot (2)
- Makkinoso (1)
- MANIMAL (1)
- Maria Antunes (1)
- Maria Cristina Martino (1)
- Marie Winger-Meyer (1)
- Marisa Straccia (1)
- Maritza of Soto Softies (1)
- Mark Meyers (2)
- Matthew Weekley (2)
- Mauerlat (2)
- Mauricio Murillo (1)
- Maxrock (1)
- Mazzalicious (3)
- Meffi (1)
- melodreama (1)
- Meni Tzima (1)
- Mheisler (2)
- Midas (1)
- Mike Slobot (3)
- Miscreation – Jeremi Rimel (11)
- Miskellaneous (3)
- Miss Peal (3)
- Moggis (1)
- Monkej (2)
- Monster Decay (1)
- Mr Jones (1)
- Mr. Do It Right (2)
- Muju (1)
- Munkyman (1)
- N.C. Winters (3)
- Nanan1 (2)
- Nevermore (1)
- NIARK1 (1)
- Nicholas McPherson (1)
- Nix Toxic (2)
- Noosed Kitty (Jamie Fales) (1)
- NREAZON (1)
- Nugglife (1)
- omnicollective (1)
- Optikmass (3)
- OsirisOrion (4)
- Patrick Francisco (7)
- Paulie (1)
- Phu! (5)
- PleaseFlush (2)
- Plushism – Nico Teo (3)
- Pocketwookie (1)
- POLYESTER (1)
- pottstarr (M. G. Litan) (2)
- Ready2Rumbl (2)
- Ricardo Porven (1)
- Riccardo Bucchioni (2)
- Richard Page (1)
- Rikky Carrion (1)
- Rino Valente (1)
- Riot68 (14)
- Robert Anaya Jr. (2)
- Robson Lelis (1)
- Robyn Fabsits (2)
- Rotobox Vinyl Anatomica (4)
- Rustedhalo (1)
- Ryan Crippen – Reactor88 (10)
- S4ndm4n – Matthew Beers (1)
- Santiago Robles (1)
- Sarah Miskelly (1)
- Sarah S (1)
- Saturn Sixx (1)
- SCAVE (4)
- Scribble (1)
- Selph (4)
- Sheryo (2)
- Shuijingfantasy (2)
- Simon Mitchell (1)
- Simon Wong (1)
- Simplequirk (1)
- siXsiXsiX – Mike Friedrich (2)
- Sjors Trimbach (3)
- SNUB (1)
- Somanyprojects (1)
- Spooky Daddy (3)
- Squidboy- Shan Michael Evans (11)
- Squink (5)
- SteamCrow (1)
- Stephanie (1)
- Steve Talkowski (3)
- Steve Tenebrini – Cerdo (1)
- SukiSuki (3)
- Supersentido (1)
- Surya and Sigit (1)
- Swanski (1)
- Tamie Snow (1)
- Tan-ki (1)
- Tat Amie (1)
- TazX (1)
- Ted Stilson (4)
- The Burger Lord – Scott (1)
- The Killer Gerbil (2)
- ThePete (1)
- the_lover (3)
- thisisrabbit (1)
- Tibor Simon (1)
- Tony (1)
- Toysrevil (1)
- Trenton M (3)
- Troy Stith (3)
- Twit©H (1)
- VANG (1)
- veer (1)
- Vi @ Graphicairlines (1)
- Victor Huang (1)
- Victor Huang (2)
- Vito (1)
- Walter Jacott aka. Chauskoskis (1)
- Wavedog (9)
- Woser (1)
- Yiao (2)
- Zebulon (1)
- Competitions (6)
- Custom Toy Tutorials (5)
- Events & Exhibitions (SEEN) (11)
- Events & Exhibitions (UPCOMING) (17)
- Call For Artists (3)
- Events And Shows (10)
- America (10)
- Hand Made Plush (59)
- Large Plush Toys (42)
- Mini Plush Toys (12)
- Interviews (2)
- Large Vinyl Toys (336)
- 10" Gosho (1)
- 10" Icebots (1)
- 10" Knuckle bear (1)
- 10" Trexi (4)
- 10†Teddy Troop (5)
- 12" FLCL Canti (1)
- 18" Knuckle Bear (1)
- 19" Zlik (1)
- 6" Skumbo (1)
- 7" Smash (1)
- 8" Moody (10)
- All City Style Subway Car (1)
- Buzz Carney (3)
- Circus Punks (3)
- Dalek (1)
- Doze Green Travela (1)
- Dr. Bomb (2)
- Floaty Bear (1)
- Fourcube (1)
- Grabbit (1)
- Hellhound (1)
- JAMUNGO 9" B.U.D. (7)
- JAMUNGO 9" NADE (7)
- JAMUNGO SQWERT (1)
- Kidrobot 10" Labbits (2)
- Kidrobot 5" Labbits (3)
- Kidrobot 6" Teeter (1)
- Kidrobot 7" Munny (4)
- Kidrobot 8" Dunny (23)
- Kidrobot 8" Munny (109)
- Kidrobot Mega Munny (4)
- Kidrobot Munny Mobile (1)
- Large Rubby Ducky (1)
- Lunartik in a cup of tea (1)
- Mad*L (14)
- Mega Meatwad (1)
- MegaGwin 13" (1)
- NedZed (1)
- NedZed (1)
- Ningyo Gosho (1)
- Pink Veil by Jermaine Rogers (1)
- Plaseebo (1)
- Rolito (1)
- Sam Flores' Fatima (1)
- SwearBear (1)
- Toy2r 16" Qee (3)
- Toy2r 8" Qcat (1)
- Toy2r 8" Qee (40)
- Toy2r Rolitoboy (1)
- UNKL SUG (1)
- Mini Vinyl Toys (135)
- 3" Baby Di Di & Mei Mei (1)
- 3" Mad*L (3)
- 3" Trexi (2)
- 3" Whalenas (1)
- 3.5" Teddy Troop (1)
- 4" Icebot (1)
- Artoyz Chaos Monkey (1)
- Bagman (1)
- Broken Heart Robot (1)
- Get Small Jeremy Fish (1)
- Kaniza – StarFish (1)
- Kidrobot 2" Labbits (4)
- Kidrobot 3" Dunny (40)
- Kidrobot 3" Fatcap (1)
- Kidrobot 4" Bub (1)
- Kidrobot 4" Mini Munny (57)
- Munnyworld 4" Mini Trikky (1)
- Scarygirl City Folk (1)
- Snorse by Pete Fowler (1)
- Tamo (6)
- Toby HK (1)
- Toy2r Baby Qee (3)
- U.B.Funkey (1)
- Vimobot (4)
- Shop (2)
- Site News/Annoucements (4)
- Various Toys (34)
- Cars (3)
- Paper Toys (13)
- Plaster Toys (3)
- Wood Toys (4)
- Videos (1)
Archives
- March 2016
- December 2014
- August 2012
- July 2012
- April 2012
- September 2010
- August 2010
- July 2010
- June 2010
- May 2010
- April 2010
- March 2010
- February 2010
- January 2010
- December 2009
- October 2009
- September 2009
- August 2009
- July 2009
- June 2009
- May 2009
- April 2009
- March 2009
- February 2009
- January 2009
- December 2008
- November 2008
- October 2008
- September 2008
- August 2008
- July 2008
- June 2008
- May 2008
- April 2008
- March 2008
- February 2008
- January 2008
- December 2007
- November 2007
- October 2007
- September 2007
- August 2007
- June 2007
- May 2007
- April 2007
- March 2007
- February 2007
Meta
Art
Designer Vinyl Toys
- Crazy Toyz
- Custom Toy World
- Dunny Club
- Kitoy
- Mine Has Blue Wings
- Miscreation Toys
- Omni Monster
- Plastic And Plush
- Toy Break
- Toysrevil
- Vince Toys Studio
- Vinyl Abuse
- Vinyl Addiction
- Vinyl Pulse
- Vinyl Toys Forum
- Wondertoyz