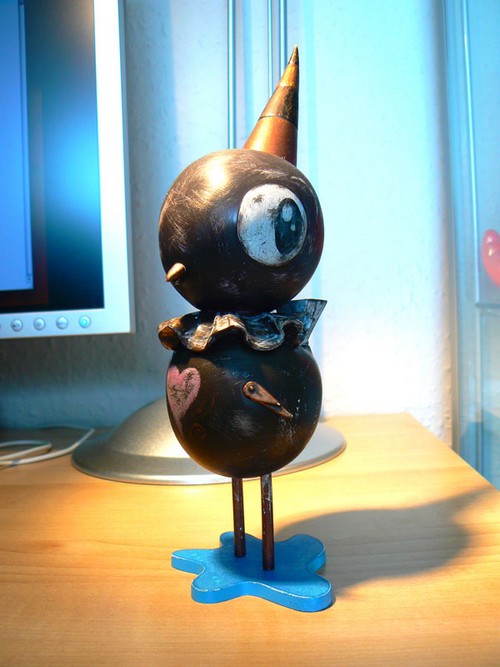
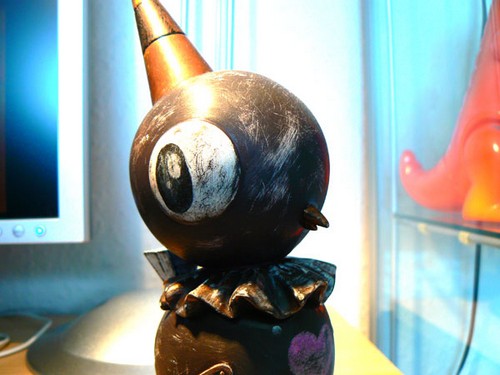
VintageBird – Squink!
May 24, 2009 Author: Raphael | Filed under: SquinkThe Story:
Sometimes on their journeys Night Walkers get lost in unfamiliar skies. Similar to a chameleon a Night Walker will change it’s colors to match it’s surroundings. This particular Night Walker got lost somewhere near the Horse Head Nebula and turned red!
Materials:
– A MadL toy (a blank or already purchased one)
– Hair dryer (for removing the head from the body)
– Nail polish remover (only required if using an already painted MadL)
– Cotton balls (to be used alongside the nail polish remover)
– Krylon Spray paint (you can use a color of your choice)
– Acrylic paints (Galleria and Liquitex are used in this tutorial)
– Paint brushes (well duh!)
Instructions:
1) Toy time! Generally I start by making sure my art table is reasonably clean/clear of dust so as to not have nasty paint later on in the process.
I then think about what I want to paint, and what toy I feel like working on that day. Today I picked a 5″ MadL.
First off if the toy has any accessories/jewelry like mine did, I start by cutting it off, unless I want to save it for later, in that case I skip the cutting step and go straight to step 2
2) Heat Time! The Hairdryer is your friend, just watch your fingers, kids get your parents to help you with this. MadL’s only have one joint which makes this easy, you’ll want to apply the heat until the bottom of the head is pliable but not TOO soft or you’re likely to ruin the toy. Repeat this step after step 4
Pull the MadL’s head til it is removed. Sometimes you’ll need to use the hair dryer a few times over, depends on the toy.
3) Strip time! Get your supplies, I use extra strength nail polish remover and cotton balls to remove the initial paint. I never completely remove the paint if I am going to use spray paint, just rub it off until any raised paint is no longer raised. It will have a very smeary ruined look about now.
4) Spray time! I use Krylon spray paint for Plastics. It sticks better and dries faster than other paints. Go outside for this, I take an old cardboard box and set the toy on top. You’ll just want to dust the toy with the paint, it doesn’t need to be solid but everything needs to have some paint on it. Let it dry fully, since it’s only a dusting, it shouldn’t take more than 15 minutes to dry.
5) Time to paint! Take your toy inside and get your paint and palette ready. I use Galleria or Liquitex acrylic paints, they both work very well. Apply black paint to the whole toy, and allow it to dry.
6) Dry Brush Time! Take a medium sized brush make sure it’s dry, and mix up 1-3 colors of your choice, I picked hot pink and red for this toy, and dip your brush in the paint, and then wipe it off on a paper towel til there is just a hint of color left when you wipe it on the towel. Then you’ll just lightly brush all over the toy, push harder if you want a brighter spot of color or lighter for just a hint of color. Allow each separate color to dry before applying the next color.
7) Detail Time! I usually just have it when I paint the face and the stars on, but you can use a pencil to rough in where you want your face. I use a really really tiny brush for the stars. After that it’s done! Don’t worry about brush marks, that’s the whole point of dry brushing, messy is fun!
8) Spray with clear coat to protect the paint job. Voila, you’re done!
Artist name: Squink!
Artist website: squinky.co.uk
Artist location: Sheffield, United Kingdom
Toy Name: VintageBird
Toy Type: Kathie Olivas Redbird
Toy Story: Found at the back of the elephants carriage, this has been carefully cleaned and disinfected.
Toy Available for sale: Nope, unfortunately this toy is not available for sale.
Artist available for commission? Contact via www.squinky.co.uk

Categories
- Artists (580)
- 12punt3 (2)
- 64 Colors (2)
- aargh (1)
- Aaron "Aaalke" Keeling (1)
- Aaron Boy (2)
- AKA MAG (2)
- AKO – Akayo (1)
- Albert Art (1)
- Alex (aka Lizard J) (1)
- Amy Jenkins (1)
- Angelica (4)
- Anna Hamilton (3)
- Anna Härlin (1)
- Aparatchik (3)
- APW@HY (1)
- AtK (1)
- Attila (6)
- Augiewan (2)
- BELL (4)
- Ben The Illustrator (3)
- Bil BetsOvic (16)
- Biscuitboy (1)
- BleedingEdges (1)
- Bob Conge – Plaseebo (7)
- Bob Horner (1)
- Bovinyl (1)
- Brent Nolasco (1)
- Brian Castleforte (5)
- Brian Colin (2)
- Brigid Ashwood (1)
- Bruce Richardson (2)
- Bryan Collins (3)
- Bytedust (3)
- Catherine J. Cruz (Kositanont) (1)
- Charles Rodriguez (2)
- Charlie Alan Kraft (1)
- Charuca (1)
- Cherise R. Ward (1)
- Chris Athans (1)
- ciah-ciah (3)
- Cidenzo (2)
- Clint Anscombe (1)
- Cloudsfactory (1)
- Cocoakoala (2)
- Collin David (1)
- Coreroc (5)
- Cragmire (6)
- Creepy (aka J. Yonkman) (1)
- Cynjon Noah (1)
- D Emory Allen (2)
- D-LuX (1)
- Dan May (1)
- danii (1)
- Danny Roldan (4)
- Darryl Kluskowski (1)
- das mo (2)
- Davidrios Ferreira (2)
- Dawid R. Kwiatkowski (1)
- Derek Kiser (1)
- DJA aka Left-I (12)
- Django / TheRealDjango (1)
- DLi$h (2)
- Doktor A (7)
- Doug Land. (1)
- Dr. Bao / NVC Crew (1)
- DragonCypher (1)
- Dril One (3)
- Dust (1)
- Eloole (2)
- EmaStudio (1)
- enigmainsoluto (2)
- Ennio Milani (1)
- Era (1)
- Erwin Weber (7)
- Esro (1)
- Eyebone (5)
- Fabio Rossi (1)
- Fabiola Baires (3)
- Federico Gonzalez (2)
- Federico Mancosu (1)
- Felix Jackson (1)
- fershozombie (1)
- Fervid Unicorn (1)
- Fi the Imaginator (1)
- Flod (1)
- Florence McLean (2)
- Fluffels (1)
- Freck (1)
- Frenchie (2)
- Gawein (5)
- Gigglesauce (2)
- Gods & Monsters (1)
- GoNi (1)
- Grimsheep (2)
- Hans Yim (2)
- Hellopike (2)
- Hugh Rose (1)
- Idle (5)
- Ingeborg Hairwassers (1)
- Irfan Hendrian (1)
- Israel Chavira (8)
- ivy (1)
- James "Jimbot" Demski (2)
- James – Style43 (1)
- James yeah (4)
- Jared Gagne (2)
- Jason Kochis (7)
- JennyFur Deveraux (3)
- Jeremiah Ketner (1)
- Jesse Hernandez (1)
- Jim Koch (4)
- JMS – Jovy (4)
- João Silva (1)
- Joe Grady – RebelWookiee (2)
- Joe Grady a.k.a. RebelWookiee (2)
- Jon Daulby (1)
- Jonathan Minori (1)
- JonDoesDoodles (2)
- jonpaulkaiser (4)
- Jorge Koke Petit (1)
- Josh (f+) Pearce (3)
- Josh Divine (1)
- JP Artwork (2)
- K.I.A. (1)
- KaNO (1)
- Karitas Palsdottir (1)
- kas (1)
- Kat Brunnegraff (3)
- Keeley Carrigan – BlooEmpire (1)
- Kenn Munk (7)
- Kerry Lee (1)
- Kevin Gosselin (2)
- Kill Taupe (1)
- Konako (1)
- KT (1)
- Kye Pirrie (1)
- La Merguez Masquée (1)
- Laska Comix (1)
- Lawrence Northey (1)
- Leecifer (1)
- Leftygohome aka. SMS (1)
- LEX (8)
- Lizard J (1)
- Lou Pimentel (2)
- Lydia Dekker (1)
- M.A.R.T.A (2)
- Mad Pierrot (2)
- Makkinoso (1)
- MANIMAL (1)
- Maria Antunes (1)
- Maria Cristina Martino (1)
- Marie Winger-Meyer (1)
- Marisa Straccia (1)
- Maritza of Soto Softies (1)
- Mark Meyers (2)
- Matthew Weekley (2)
- Mauerlat (2)
- Mauricio Murillo (1)
- Maxrock (1)
- Mazzalicious (3)
- Meffi (1)
- melodreama (1)
- Meni Tzima (1)
- Mheisler (2)
- Midas (1)
- Mike Slobot (3)
- Miscreation – Jeremi Rimel (11)
- Miskellaneous (3)
- Miss Peal (3)
- Moggis (1)
- Monkej (2)
- Monster Decay (1)
- Mr Jones (1)
- Mr. Do It Right (2)
- Muju (1)
- Munkyman (1)
- N.C. Winters (3)
- Nanan1 (2)
- Nevermore (1)
- NIARK1 (1)
- Nicholas McPherson (1)
- Nix Toxic (2)
- Noosed Kitty (Jamie Fales) (1)
- NREAZON (1)
- Nugglife (1)
- omnicollective (1)
- Optikmass (3)
- OsirisOrion (4)
- Patrick Francisco (7)
- Paulie (1)
- Phu! (5)
- PleaseFlush (2)
- Plushism – Nico Teo (3)
- Pocketwookie (1)
- POLYESTER (1)
- pottstarr (M. G. Litan) (2)
- Ready2Rumbl (2)
- Ricardo Porven (1)
- Riccardo Bucchioni (2)
- Richard Page (1)
- Rikky Carrion (1)
- Rino Valente (1)
- Riot68 (14)
- Robert Anaya Jr. (2)
- Robson Lelis (1)
- Robyn Fabsits (2)
- Rotobox Vinyl Anatomica (4)
- Rustedhalo (1)
- Ryan Crippen – Reactor88 (10)
- S4ndm4n – Matthew Beers (1)
- Santiago Robles (1)
- Sarah Miskelly (1)
- Sarah S (1)
- Saturn Sixx (1)
- SCAVE (4)
- Scribble (1)
- Selph (4)
- Sheryo (2)
- Shuijingfantasy (2)
- Simon Mitchell (1)
- Simon Wong (1)
- Simplequirk (1)
- siXsiXsiX – Mike Friedrich (2)
- Sjors Trimbach (3)
- SNUB (1)
- Somanyprojects (1)
- Spooky Daddy (3)
- Squidboy- Shan Michael Evans (11)
- Squink (5)
- SteamCrow (1)
- Stephanie (1)
- Steve Talkowski (3)
- Steve Tenebrini – Cerdo (1)
- SukiSuki (3)
- Supersentido (1)
- Surya and Sigit (1)
- Swanski (1)
- Tamie Snow (1)
- Tan-ki (1)
- Tat Amie (1)
- TazX (1)
- Ted Stilson (4)
- The Burger Lord – Scott (1)
- The Killer Gerbil (2)
- ThePete (1)
- the_lover (3)
- thisisrabbit (1)
- Tibor Simon (1)
- Tony (1)
- Toysrevil (1)
- Trenton M (3)
- Troy Stith (3)
- Twit©H (1)
- VANG (1)
- veer (1)
- Vi @ Graphicairlines (1)
- Victor Huang (1)
- Victor Huang (2)
- Vito (1)
- Walter Jacott aka. Chauskoskis (1)
- Wavedog (9)
- Woser (1)
- Yiao (2)
- Zebulon (1)
- Competitions (6)
- Custom Toy Tutorials (5)
- Events & Exhibitions (SEEN) (11)
- Events & Exhibitions (UPCOMING) (17)
- Call For Artists (3)
- Events And Shows (10)
- America (10)
- Hand Made Plush (59)
- Large Plush Toys (42)
- Mini Plush Toys (12)
- Interviews (2)
- Large Vinyl Toys (336)
- 10" Gosho (1)
- 10" Icebots (1)
- 10" Knuckle bear (1)
- 10" Trexi (4)
- 10†Teddy Troop (5)
- 12" FLCL Canti (1)
- 18" Knuckle Bear (1)
- 19" Zlik (1)
- 6" Skumbo (1)
- 7" Smash (1)
- 8" Moody (10)
- All City Style Subway Car (1)
- Buzz Carney (3)
- Circus Punks (3)
- Dalek (1)
- Doze Green Travela (1)
- Dr. Bomb (2)
- Floaty Bear (1)
- Fourcube (1)
- Grabbit (1)
- Hellhound (1)
- JAMUNGO 9" B.U.D. (7)
- JAMUNGO 9" NADE (7)
- JAMUNGO SQWERT (1)
- Kidrobot 10" Labbits (2)
- Kidrobot 5" Labbits (3)
- Kidrobot 6" Teeter (1)
- Kidrobot 7" Munny (4)
- Kidrobot 8" Dunny (23)
- Kidrobot 8" Munny (109)
- Kidrobot Mega Munny (4)
- Kidrobot Munny Mobile (1)
- Large Rubby Ducky (1)
- Lunartik in a cup of tea (1)
- Mad*L (14)
- Mega Meatwad (1)
- MegaGwin 13" (1)
- NedZed (1)
- NedZed (1)
- Ningyo Gosho (1)
- Pink Veil by Jermaine Rogers (1)
- Plaseebo (1)
- Rolito (1)
- Sam Flores' Fatima (1)
- SwearBear (1)
- Toy2r 16" Qee (3)
- Toy2r 8" Qcat (1)
- Toy2r 8" Qee (40)
- Toy2r Rolitoboy (1)
- UNKL SUG (1)
- Mini Vinyl Toys (135)
- 3" Baby Di Di & Mei Mei (1)
- 3" Mad*L (3)
- 3" Trexi (2)
- 3" Whalenas (1)
- 3.5" Teddy Troop (1)
- 4" Icebot (1)
- Artoyz Chaos Monkey (1)
- Bagman (1)
- Broken Heart Robot (1)
- Get Small Jeremy Fish (1)
- Kaniza – StarFish (1)
- Kidrobot 2" Labbits (4)
- Kidrobot 3" Dunny (40)
- Kidrobot 3" Fatcap (1)
- Kidrobot 4" Bub (1)
- Kidrobot 4" Mini Munny (57)
- Munnyworld 4" Mini Trikky (1)
- Scarygirl City Folk (1)
- Snorse by Pete Fowler (1)
- Tamo (6)
- Toby HK (1)
- Toy2r Baby Qee (3)
- U.B.Funkey (1)
- Vimobot (4)
- Shop (2)
- Site News/Annoucements (4)
- Various Toys (34)
- Cars (3)
- Paper Toys (13)
- Plaster Toys (3)
- Wood Toys (4)
- Videos (1)
Archives
- March 2016
- December 2014
- August 2012
- July 2012
- April 2012
- September 2010
- August 2010
- July 2010
- June 2010
- May 2010
- April 2010
- March 2010
- February 2010
- January 2010
- December 2009
- October 2009
- September 2009
- August 2009
- July 2009
- June 2009
- May 2009
- April 2009
- March 2009
- February 2009
- January 2009
- December 2008
- November 2008
- October 2008
- September 2008
- August 2008
- July 2008
- June 2008
- May 2008
- April 2008
- March 2008
- February 2008
- January 2008
- December 2007
- November 2007
- October 2007
- September 2007
- August 2007
- June 2007
- May 2007
- April 2007
- March 2007
- February 2007
Meta
Art
Designer Vinyl Toys
- Crazy Toyz
- Custom Toy World
- Dunny Club
- Kitoy
- Mine Has Blue Wings
- Miscreation Toys
- Omni Monster
- Plastic And Plush
- Toy Break
- Toysrevil
- Vince Toys Studio
- Vinyl Abuse
- Vinyl Addiction
- Vinyl Pulse
- Vinyl Toys Forum
- Wondertoyz